Animated Graphics
Interactive Plots
By default, everything you plot using Plot, Graphics, or Graphics3D can be dragged, panned, or rotated. This behavior is controlled by options and can be disabled if necessary. For example:
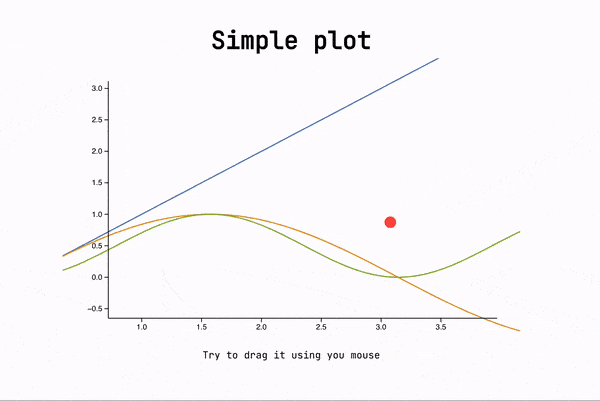
Figure = Plot[{x, Sin[x], Sin[x]^2}, {x, 0, 2Pi}];
.slide

# Simple plot

<Figure/>

Try dragging it with your mouse
The result will look like the following:
Animation
In general, all visuals can be created in the same way as in regular cells, since the same components are used.
When a slide becomes visible or a fragment is revealed (see Transitions and Fragments), it fires an event where all information is encoded. To enable this, use SlideEventListener.
Place SlideEventListener anywhere on the slide to hook up the WL Kernel to all events associated with it.
Keep the dynamic variables scoped using LeakyModule and use explicit event routing as shown in routing. This will make it easier to reuse your components on other slides.
Example 1 🗒️ Dynamic Plot, Local Event Routing
Here is an example of a widget that plots a 2D dataset and updates the content on the next click using Fragments:
.wlx

PlotWidget[OptionsPattern[]] := Module[{
  data = OptionValue["DataA"]
},

  With[{
    Canvas = Graphics[{
      ColorData[97][1], Line[data // Offload]
    }, Axes -> True, ImageSize -> 500, TransitionDuration -> 1000],

    uid = CreateUUID[],

    dataA = OptionValue["DataA"],
    dataB = OptionValue["DataB"]
  },

    EventHandler[uid, {
      "fragment-1" -> Function[Null,
        data = dataB
      ],

      ("Left" | "Destroy" | "Slide") -> Function[Null,
        data = dataA
      ]
    }];

    <div class="flex flex-col gap-y-2">
      <Canvas/>
      <div class="fragment">Dummy text</div>
      <SlideEventListener Id={uid}/>
    </div>
  ]
]

Options[PlotWidget] = {"DataA" -> {}, "DataB" -> {}};
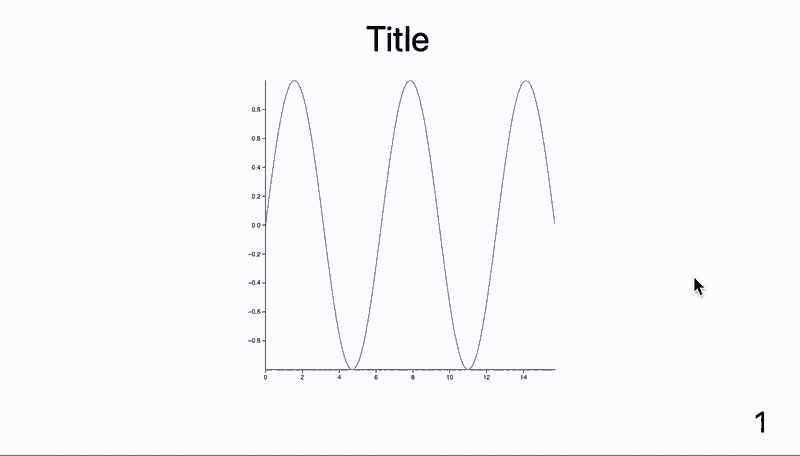
Now generate a dummy dataset:
{dataA, dataB} = {
  Table[{x, Sin[x]}, {x, 0, 5Pi, 0.1}],
  Table[{x, Tan[x]}, {x, 0, 5Pi, 0.1}]
};
And place it anywhere on a slide:
.slide

# Title

<PlotWidget DataA={dataA} DataB={dataB}/>

---

Go back?
The result:
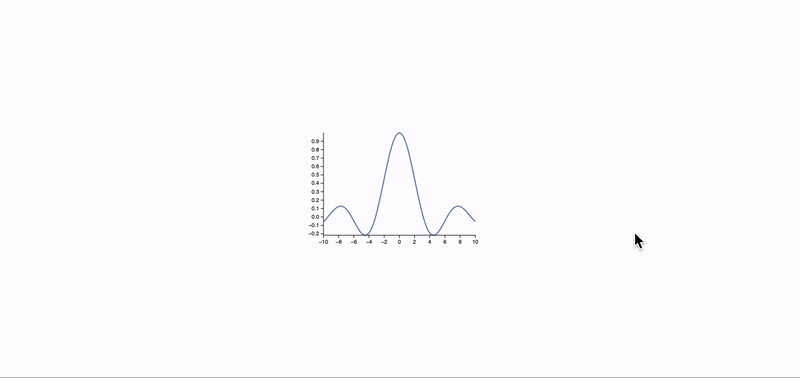
Example 2 🔎 Zoom
Zoom into the graph:
Plt[OptionsPattern[]] := With[{ev = OptionValue["Zoom"], scene = FrontInstanceReference[]},
  EventHandler[ev, {
    "Slide" -> Function[Null,
      FrontSubmit[ZoomAt[1], scene]
    ],

    "fragment-1" -> Function[Null,
      FrontSubmit[ZoomAt[2], scene]
    ]
  }];

  Plot[Sinc[x], {x, -10, 10}, Epilog -> {scene}]
]

Options[Plt] = {"Zoom" -> ""}
.slide

# Zoom in

---

<Plt Zoom={"vslide"}/>

Zoom <!-- .element: class="fragment fade-in" data-fragment-index="1" -->

<SlideEventListener Id={"vslide"}/>
Example 3 🔄 Simple Stat Counter
What if you need to add some dynamic stats to your presentation? You can create an independent component for that:
.wlx

Stat[Text_, OptionsPattern[]] := LeakyModule[{
  cnt = 0,
  task
}, With[{
  ev = CreateUUID[],
  HTMLCounter = HTMLView[cnt // Offload],
  max = OptionValue["Count"]
},
  EventHandler[ev, {
    "Destroy" -> Function[Null,
      EventRemove[ev];
      If[task["TaskStatus"] === "Running", TaskRemove[task]];
      ClearAll[task];
    ],

    "Left" -> Function[Null,
      cnt = 0;
    ],

    "Slide" -> Function[Null,
      If[task["TaskStatus"] === "Running", TaskRemove[task]];
      task = SetInterval[
        If[cnt < max, cnt = cnt + 1,
          TaskRemove[task];
        ];
      , 15];
    ]
  }];

  <div class="text-center text-gray-600 m-4 p-4 rounded bg-gray-100 flex flex-col">
    <HTMLCounter/>
    <span class="text-md"><Text/></span>
    <SlideEventListener Id={ev}/>
  </div>
] ]

Options[Stat] = {"Count" -> 1};
You can place them on any slide (as many as you want):
.slide

# Dynamic Stats
Here is our data

<div class="justify-center flex flex-row ml-auto mr-auto">

<Stat Count={128}>Label 1</Stat>
<Stat Count={256}>Label 2</Stat>

</div>
Here is the result:

Append Graphics to a Slide
Buttons, Sliders, etc.
See examples in InputRange.