Notebook Tools
WLJS Notebook is fully accessible from the keyboard. One of the most important key combinations to know is Ctrl-P or ⌘-P, which brings up the Command Palette. From here, you have access to many small helper utilities, toolboxes, shortcuts:
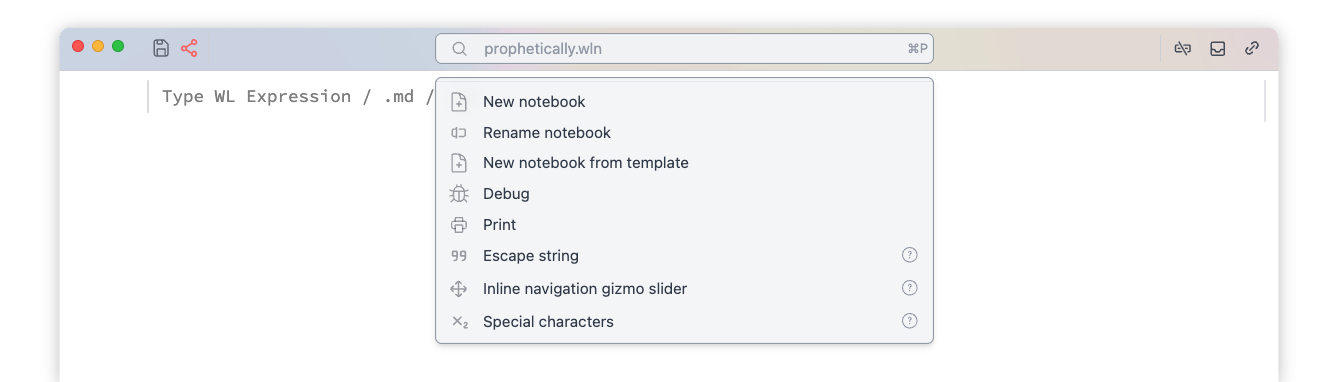
Most of the utilities are notebooks themselves, which are evaluated in an isolated context whenever you click on a command palette item. You can find the information on each by clicking on icon, that will open the source notebook.
~/Documents/WLJS Notebooks/User palette/Shortcuts
Type any of those words to call the action:
- New notebook - create a new notebook (in a new window)
- New notebook from template - create a new notebook from a template
- Rename notebook - rename current notebook
- Debug - attach a debugger
- Print - export an entire notebook to PDF
Utilities
Every tool is a normal notebook, which is evaluated in the background and manipulates your working notebook, creating temporal cells whenever you call it from the palette.
Insert matrix
Creates a small widget in the cell below the focused one that helps to generate and insert matrices (lists of lists).
Place a cursor to the desired place in the cell and click Insert on the widget.
Special characters
Adds a toolbar to the notebook with special characters and snippets for writing nice-looking integrals, sums, and other constructs.
Select the piece of code and apply operation from the toolbar. Or place a cursor to a cell and insert a symbol/expression from the toolbar.
Format text
Adds a toolbar to the notebook for formatting code (font size, color, background, font face).
Select the piece of code and apply operation from the toolbar.
Upload ASCII data file
Creates a widget with importing wizard allowing to import CSV/TSV/DAT files, strip headers and insert a file to a cell as an iconized expression
Upload file
Basic widget for uploading files
Escape string
A helper tool to safely insert strings containing double quotes or other "unsafe" sequences. It will prompt a user to enter text and print a cell with the result.
Beautify code
Formats selected code or entire Wolfram input cell and attempts to apply syntax sugar if possible. If it fails, try Format code instead.
Select the code or place a cursor in the desired cell and call this tool from the command palette.
Format code
Formats selected code or entire Wolfram input cell. Action is the same as the previous one, but syntactic sugar is not applied.
Find in cells
Creates a floating search window and tries to find given expression in all visible cells of the notebook.
Show options
Attempts to discover the possible options of the given symbol in the cell and present them as an interactive table.
Start typing:
Plot[x, {x,0} and then call this widget. It will automatically find the unclosed bracket and fetch the head Plot. Click on the desired options in the table to insert them later, once you click on the green mark icon.
Notebook directory
Opens a notebook directory using OS's explorer.
Inline navigation helper (Slider)
A helper tool that creates a syntactic sugar inline widget on a selected number. It is used in 2D and 3D graphics or any other expression that supports Offload aka live-updates:
For example: select a number you want to manipulate and call this tool. It will create an inline widget with a slider. Evaluate your cell, manipulate the slider, and once you are satisfied, click on the mark icon.
OffloadInline navigation helper (Drag)
A helper tool that creates a syntactic sugar inline widget on a selected pair {x,y} or triplet of numbers {x,y,z}. It is used in 2D and 3D graphics that support Offload aka live-updates:
For example: select a parameter's initial value you want to manipulate and call this tool. It will create an inline widget with a display and place a dragging gizmo on your 2D or 3D canvas. Evaluate your cell, drag the red dot (or 3D sphere), and once you are satisfied, click on the mark icon.
If your dragging point overlaps with an object, offset the coordinates before applying this tool:
Text["Hello World", Offload[{-0.3,-0.3} + (*BB[*)({0,0})(*,*)(*"1:eJxTTMoPSmNkYGAoZgESHvk5KRAeB5AILqnMSXXKr0hjgskHleakFnMBGU6JydnpRfmleSlpzDDlQe5Ozvk5+UVFDGDwwR6dwcAAAAHdFiw="*)(*]BB*)]]
Apply dragging tool on highlighted list. Why we used Offload - check this guide.
Inline navigation helper (Joystick)
A helper tool that creates a syntactic sugar inline widget on a selected pair {x,y}. It is used in 2D and any other expression that supports Offload aka live-updates and accepts a pair of numbers:
For example: select a parameter's initial value you want to manipulate and call this tool. It will create an inline widget with a joystick. Evaluate your cell, manipulate the joystick, and once you are satisfied, click on the mark icon.
Take a picture
Creates a widget, which uses any available video recording device to take a picture and place it as Image to a notebook's cell.
Record voice
Creates a widget which uses any available audio recording device to record live audio and place it to a cell as Audio object.
Crop image
Select an image or image-producing expression in your cell and call this tool. It will evaluate the selected expression and append an interactive widget allowing to do rectangular cropping.
Copy InputForm
Select the code in the cell and call this tool. It will strip all syntactic sugar from it and copy the pure InputForm of the expression to your clipboard.
Debugger
Debugger can be called from the top Misc menu or from the command palette. It is a tool that attaches to a notebook and a working kernel to intercept the evaluation process and monitor symbol changes.
What it can do:
- Interrupt cell evaluation and possibly inspect the intermediate results
- Track changes in symbols values
- Break on assertions or symbol changes
- See low-level system log
What it cannot do:
- Profile and trace evaluation
- Step in / step out
Let's have a look at the interface:
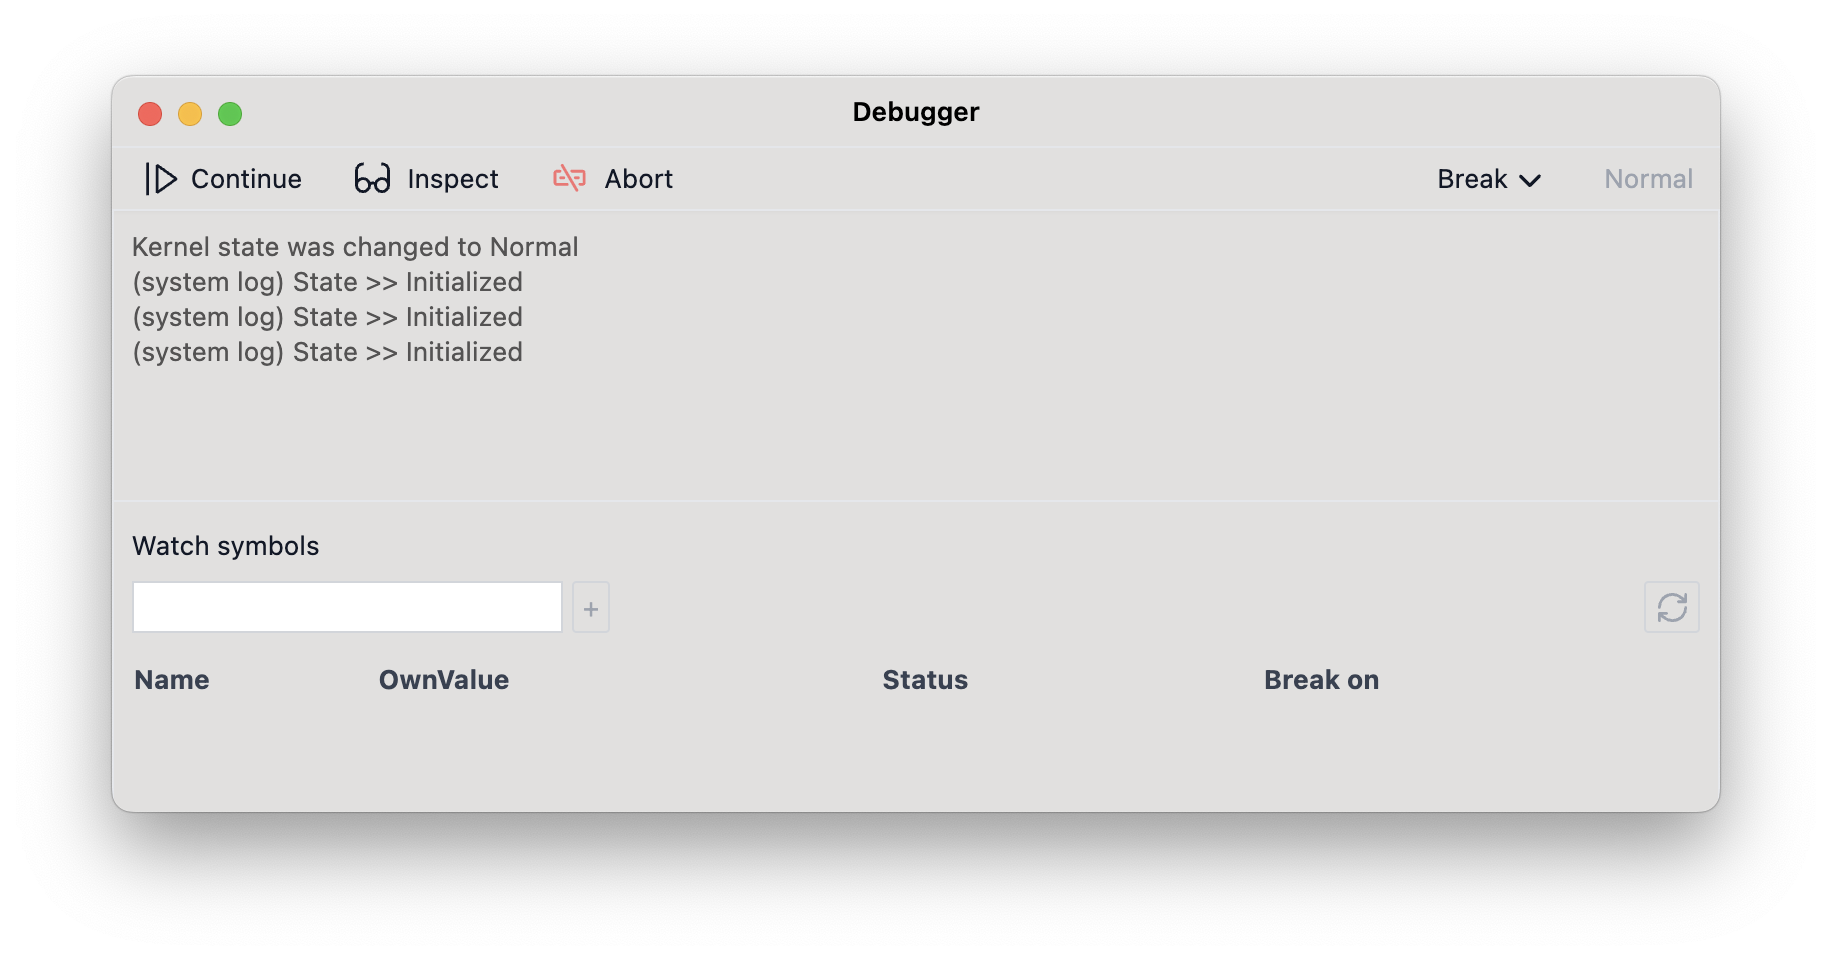
Inspect is a central mode for debugging.
Inspecting Mode
It stops the current execution and allows you to interact with any other cells in the sub-session, enabling you to check the status of various symbols. You can write and evaluate other cells in Inspect mode.
For example, evaluate this one:
Do[k = i; Pause[1], {i, 100}];Then switch to Inspect mode; it will pause the evaluation. Now, you can check the state of the k symbol by running a new cell with:
kYou can always continue execution from this mode by clicking Continue until the next possible break. All transitions take time and depend on the current kernel occupancy.
Watching Symbols
You can add a symbol to a tracking list to monitor its OwnValue in real-time automatically. It won't interrupt your execution unless you enable the checkbox for that option.
Live updates are supported only for assignments, i.e., when symbol = *newValue*. If you mutate a part of a List, it won't trigger an update.
Breakpoints
In Wolfram Language, traditional breakpoints are difficult to implement since there is no source code file in the classical sense. Everything is an expression, and a breakpoint must be an expression as well.
There are two sources for breaking events, both of which immediately switch the kernel to Inspecting Mode.
Asserts
First, enable breaking on assertions from the dropdown menu in the top bar of the debugger. Then, whenever execution encounters False in an Assert, it will break.
For example:
Do[k = i; If[i > 6, Assert[False, "Hey"]]; Pause[1], {i, 100}];This code will break automatically after 6 seconds. In Inspect mode, evaluating k will return 7.
If you track the k symbol at the same time, you will see it changing in the debugger window.
Symbols
When a symbol is assigned a new value, it generates an event in the debugger. Use the Break on checkbox to enable breaking.
For example:
Do[k = i; If[i > 6, test = Now]; Pause[1], {i, 100}];This code will break after 6 iterations.
MCP Server
Model-Contex-Protocol server is always running in the background allowing LLM agents to interact with the notebook, run, edit, create cells and run code directly on the kernel. By the default it is available at:
This is a streaming (HTTP) MCP server with no authentification and / endpoint:
http://127.0.0.1:20564/It also provides specific skills for various cell types, documentation and fits into 500-600 tokens at the start.
We carefully crafted our tools, all responces to avoid unnecessary information noise, long random UIDs providing the bare mimimum data required to inspect, edit and add cells.
This feature is only available for WLJS Desktop application
Installation
You can add it to your favourite coding tool as follows:
Claude Code
claude mcp add --transport http --scope user wljs-notebook http://127.0.0.1:20564/Codex
codex mcp add wljs-notebook --url http://127.0.0.1:20564/or add to it your config.toml as
[mcp_servers.wljs_notebook]
url = "http://127.0.0.1:20564/"
Tips
-
Models are not allowed to create notebooks, but can find the "focused one"
-
Mention
focused cellin the prompt to avoid model to spend tokens for searching the whole notebook. -
Mention
consult docsin the prompt for weaker models to force them checking the documentation on different cell types or features of interactive evaluation in Wolfram language cells. -
Use smaller models for grammar corrections, primitive tasks, i.e. Haiku 3.0 for example
-
Anthropic models are generally better trained on Wolfram Language and their training data includes WLJS ecosyste
-
It is cheaper to firstly find focused notebook, then focused cell instead of using
notebook contextpath, that will list all cells and their content (only first line)
Documentation for LLM
If needed MCP searches the documentiation on a given symbol using LLM-friendly compilation of our entire website: https://wljs.io/llms-full.txt
CLI
WLJS Notebook includes a small command-line interface for evaluating code, opening notebooks, inspecting the active notebook, editing cells, evaluating cells, and consulting local WLJS/Wolfram documentation.
Most notebook-related commands print JSON to stdout. Errors are printed to stderr and return a non-zero exit code.
Notebook, cell and kernel ids may be passed bare or wrapped in '' or "". The following are equivalent:
wljs cells notebook123
wljs cells 'notebook123'
wljs cells "notebook123"
General
wljs helpPrint the list of available commands.
wljs versionPrint the installed CLI/application version.
wljs configPrint the current CLI configuration (such as the address of the running application).
Opening notebooks and folders
Pass a path directly to open it in WLJS Notebook. Supported notebook formats are .wln, .md and .html:
wljs path/to/notebook.wln
wljs ./notebook.wln
wljs ./notebook.md
wljs ./notebook.html
Use '' (or "") to shield white-space and special characters in a path:
wljs 'path/to/notebook.wln'Open a folder (use . for the current directory):
wljs path/to/folder
wljs .
Direct evaluation
Evaluate code in a ready kernel (akin to wolframscript), without creating a notebook cell:
wljs wl '<wolfram-expression>'Examples:
wljs wl 1+1
wljs wl 'Range[10]^2'
wljs wl 'Total[Range[100]]'
wljs wl 'Plot[Sin[x], {x, 0, 10}]'
Use --time-limit <seconds> to cap the evaluation time, and --kernel <kernel-id> to target a specific kernel:
wljs wl 'Pause[60]; 1+1' --time-limit 120
wljs wl 'Range[10]' --kernel <kernel-id>
The following are all aliases of wl:
wljs code 1+1
wljs -code 1+1
wljs -c 1+1
Note, that any such evaluation temporarily changes the working directory to the one where the script was called. Here is an analog of the ls or dir command:
wljs -c 'FileNames["*"]'You can also read the expression from stdin by passing - as the code:
echo 'FileNames["*"]' | wljs -c -On Windows / PowerShell quoting rules differ and double quotes inside wljs -c <code> must be escaped (e.g. \"), otherwise the expression will be mangled before it reaches the kernel. To avoid escaping altogether, pipe the expression through stdin with wljs -c -:
echo 'FileNames["*"]' | wljs -c -Notebook inspection
wljs notebooksList notebooks known to the application.
wljs new
wljs new --nocells
Create a new notebook. Use --nocells to create a completely empty notebook with no initial cells.
wljs focusedPrint the id/hash of the currently focused notebook.
wljs context
wljs context --Notebook <notebook>
Print notebook context, including notebook id, cell list, and focused cell/selection when available. If --Notebook is omitted, the focused notebook is used.
wljs cells <notebook>List cells in a notebook.
wljs focused-cell <notebook>Print the currently focused cell and selected line range.
wljs lines <cell> <from> <to>Read an inclusive, 1-indexed line range from a cell.
Example:
wljs lines cell123 1 40Print the full cell content bypassing any shortening or formatting tricks normally done in the notebook:
wljs full <cell>Editing cells
wljs add <notebook> --content <text|@file|-> [--after <cell>] [--before <cell>] [--eval]Add a new input cell. See Content input for the forms accepted by --content.
Examples:
wljs add notebook123 --content '1+1'
wljs add notebook123 --content-escaped '.md\none-line markdown'
wljs add notebook123 --content @example.wl
printf '.md\nHello World\n' | wljs add notebook123 --content - --eval
Use --content-escaped instead of --content to convert \n sequences into new lines (handy for passing multiline content inline without a literal line break).
Use --after or --before to choose where the new cell is inserted. These options are mutually exclusive.
Use --eval to evaluate the new cell after adding it.
wljs set-lines <cell> <from> <to> --content <text|@file|->Replace an inclusive, 1-indexed line range in an input cell.
Example:
wljs set-lines cell123 3 5 --content 'replacement text'wljs insert-lines <cell> <after> --content <text|@file|->Insert content after a line. Use 0 to insert at the beginning.
Example:
wljs insert-lines cell123 0 --content '.md'wljs delete-cell <cell>Delete an input cell. Deleting an input cell also deletes its outputs.
Evaluation in the notebook
wljs eval <cell> [--time-limit <seconds>]Evaluate an input cell. Evaluation creates output cells. Use --time-limit <seconds> to cap the evaluation time.
wljs project <cell>Project an input cell into a standalone window.
Documentation
wljs docs <query>Consult bundled WLJS skill docs first, then local Wolfram Language docs.
Useful queries include:
wljs docs javascript
wljs docs html
wljs docs markdown
wljs docs mermaid
wljs docs slides
wljs docs dynamics
wljs docs Manipulate
wljs docs EventHandler
wljs docs Offload
wljs docs Plot
Content input
The --content option supports three forms.
Inline literal text
wljs add notebook123 --content 'one line'Inline content is passed literally. A string like \n is not converted into a newline.
File input
wljs add notebook123 --content @example.wlReads content from example.wl.
Standard input
printf '.md\nHello World\n' | wljs add notebook123 --content -or:
wljs add notebook123 --content - <<'EOF'
.md
Hello World
EOF
This is the recommended form for multiline content.
Cell type markers
Cell type is determined by the first line of the input cell.
| First line | Cell type |
|---|---|
.md | Markdown |
.html | HTML |
.js | JavaScript |
.mermaid | Mermaid diagram |
.slide | RevealJS slide |
| no marker | Wolfram Language |
Example Markdown cell:
wljs add notebook123 --content - --eval <<'EOF'
.md
# Hello World

This is a Markdown cell.
EOF
Printing option
Locate Print from the File menu or from the command palette to print an entire notebook as PDF.
Page breaks
Use Markdown cell with PageBreakAbove or PageBreakBelow symbols to force page breaks, i.e.:
.md

<PageBreakAbove/>
Application styles
You can apply custom CSS styles to all notebooks by adding them via Settings → Custom CSS. These styles are injected into the document head and apply globally.
Adding global styles
Play around with styles using HTML cells, before injecting them globally
The styles will be applied to all windows automatically.
Available CSS classes
WLJS Notebook exposes predefined CSS classes for styling various elements:
Document structure
| Selector | Description |
|---|---|
body | The whole document |
main | Main window container |
.ccontainer | Cells container (extends to full size of main) |
.cgroup | A single group of cells: input + outputs + tools |
.cframe | Inner group of cells: input + outputs |
.cborder | Vertical line at the right side of cell group |
.cwrapper | Input/output cell wrapper |
.cseparator | Thin space between cells |
Cell states and types
| Selector | Description |
|---|---|
.cinit | Initialization cells |
.cin | Input cells parent element |
.cout | Output cells parent element |
.ttint | Focused cells |
.cgi-ico | Initialization cell group icon (teal dot) |
#sidebar-right | Right sidebar in exported HTML |
Input cell languages
| Selector | Description |
|---|---|
.clang-generic | Unknown cell type / language |
.clang-markdown | Markdown cells |
.clang-html | HTML cells |
.clang-wlx | WLX cells |
.clang-js | JavaScript cells |
.clang-slide | Slide cells |
Wolfram Language input cells have an empty class field.
Markdown output
| Selector | Description |
|---|---|
.markdown | All content in textual cells |
.cout.markdown | Markdown output cells |
.markdown h1 | Heading level 1 in markdown |
.markdown h2 | Heading level 2 in markdown |
.markdown p | Paragraphs in markdown |
Styling examples
Change notebook background
.ccontainer {
  background: lightblue;
}

body {
  background: lightblue !important;
}

main {
  background: lightblue !important;
}
Style the input cell border marker
The vertical line on the left side of input cells:
.cin > :nth-child(2)::after {
  border-color: #5e8a8b;
}
Custom heading colors
.markdown h1 {
  color: #2e7d32;
}

.markdown h2 {
  color: #1565c0;
}
Fonts and colors
The following CSS variables control syntax highlighting, UI colors:
:root {
  /* Syntax highlighting */
  --editor-key-meta: #404740;
  --editor-key-keyword: #708;
  --editor-key-atom: #219;
  --editor-key-literal: #164;
  --editor-key-string: #a11;
  --editor-key-escape: #e40;
  --editor-key-variable: #00f;
  --editor-local-variable: #30a;
  --editor-key-type: #085;
  --editor-key-class: #167;
  --editor-special-variable: #256;
  --editor-key-property: #00c;
  --editor-key-comment: #940;
  --editor-key-invalid: #f00;
  --editor-outline: #696969;
}
UI fonts can be changed using the following patch:
:root {
  /* Typography UI */
  font-size: medium;
  font-family: system-ui, -apple-system, BlinkMacSystemFont,
    'Segoe UI', Roboto, Oxygen, Ubuntu, Cantarell,
    'Open Sans', 'Helvetica Neue', sans-serif;
}

/* Typography code editor */
.cm-line {
  font-family: 'consolas' !important;
}

/* Typography textual cells */
.markdown {
  font-family: 'cursive' !important;
}
Global styles are also copied to exported standalone HTML files.
Installing Packages
How to install new packages locally?
Via Command Palette
Open your notebook and paste the GitHub link to a repo+ or URL to .paclet file to the command palette located on the top bar.
+ It must contain a PacletInfo.wl file in the root directory of the repository.
Via LPM
Create a new cell and insert:
LPMRepositories[{
    "Github" -> "https://github.com/user/MyLibrary"
}]

<<MyLibrary`
or using direct link to a paclet file
LPMRepositories[{
    "Github" -> "https://publicURL/MyLibrary.paclet"
}]

<<MyLibrary`
This will create a local folder named wl_packages, where installed packages will be stored.
Global Installation (Classic)
Via Paclets
If the package is hosted on the Wolfram repository, then you can simply run:
PacletInstall["Username/Paclet"]

<<PacletContextName`
Or from a local paclet file:
PacletInstall["path_to_it.paclet"]

<<PacletContextName`
Namespaces
If you have conflicting symbol names or want to scope loaded package into an alias context:
Needs["PacletContextName`"->"myAlias`"]Settings
In the settings menu you can adjust accent-colors, light/dark mode, home folder, backups and many other things related to the editing and exporting.